Cook, Learn, and Share to Fight Hunger.
  • 15min.
  • 7+ days
  • 1/5

Ingredients:

Pickling juice:

For Kielbasa preparation:

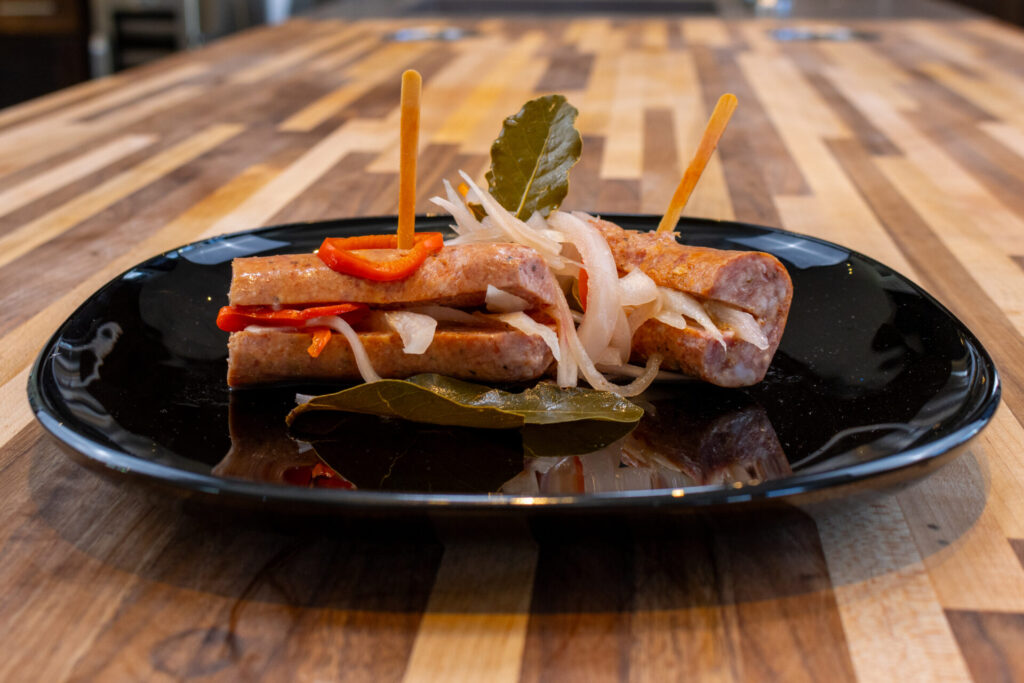
* Preferably 1 red onion and 2 yellow onions but you can use any onion that you have available – including white.

** You can substitute with other kinds of chiles or if you prefer not spicy, you can substitute with pepperoncini peppers (you can purchase pickled and drain the liquid).

*** I usually buy individual kielbasas that are about 5 – 6” long each. Optionally, you can purchase longer versions of kielbasa – these will need to be additionally cut into smaller segments.

Tools:

Recipes

Best served with:

Directions:

1. Pickling Juice:

1.1. Place into a medium pot:

4 cups of water
2 cups of distilled white vinegar
5 bay leaves
1 TSP of whole peppercorns
1 TSP of whole Allspice
2 TBSP of granulated sugar
1 TSP of salt
½ TSP of chili powder

Place the pot on high and bring to a boil with occasional stirring.

1.2.

Lower heat to medium and cook for an additional 3 minutes with occasional stirring.

1.3. Place aside and let it cool for the next step.

Notes:

  • Leave it in the pot while cooling.
  • Needs to be just partially cooled but can be cooled totally for the next step

2. Kielbasa Preparation:

2.1. Peel all 4 kielbasas.

Notes:

  • This step is optional but if you complete this step, the pickling juice will have a better chance to get absorbed by the kielbasa. Even just a partial peeling will be beneficial.
  • Kielbasa in collagen casing is usually easier to peel in comparison to animal casing. I usually prefer animal casing.
  • Try to always peel by hand as much as you can and then proceed using a paring knife. In some cases, you will be able to peel it all without a paring knife.

2.2.

Cut a pocket into each kielbasa for the following filling by performing a horizontal cut right in the center of each kielbasa with the intention of getting almost but not totally through.

3. Fill Kielbasas:

3.1.

Spread Dijon mustard on both inner parts of the kielbasas.

3.2.

Sprinkle paprika on both inner parts of the kielbasa.

3.3. Put part of the sliced onion in each kielbasas.

Notes:

  • The amount of onion you put in is up to you, but I usually put as much as I can – in case some onions falls out later on.
  • After all kielbasas are filled with onion, you are going to have some onion left, it will be needed in the following step 4.

3.4.

Use 2 toothpicks to help the onion stay in the kielbasa (run each toothpick through the top part of the kielbasa, onion, and the bottom part of the kielbasa).

4. Vegetable mixture:

4.1. Place Into a large mixing bowl:

Onions – sliced (the remaining amount)
5 cloves of garlic –sliced
Optional: 2 – 3 Fresno chiles – sliced

And thoroughly stir.

Fruit and vegetables are nutritious, full of vitamins, and are very flavorful. Even if you are not interested in gaining the health benefits or appreciate the initial taste, fruit and vegetables are often very important for creating a final flavor in many meals (creating important flavor elements). The following are ways to wash, peel, and cut your produce. In this section, I’m not able to cover all fruits and vegetables but have chosen the most common ones. In this section I’m not able to cover all fruits and vegetables but have chosen the most common ones.

Tom the Chef Tom the Chef Founder

5. Assemble:

5.1.

Place a little part of the vegetable mixture into the pickling jar.

5.2. Then place the kielbasas in the jar inusing one of two methods below. (Select your method based on your preference or the size/shape of your pickling jar):

A. Horizontal: Alternate layers of kielbasas with layers of vegetable mixture.

B. Vertical: Place all kielbasas in vertically and squeeze the vegetable mixture in between the sausages and place the rest on the mixture on the top.

Note: Keep in mind that you can optionally cut each kielbasa into halves to better fit to your selected method.

5.3.

Pour the cooled pickling juice over (including bay leaves, peppercorn, and Allspice) to make sure that the kielbasas and vegetables will be fully submerged.

5.4.

Tightly close with a lid.

6. Resting:

6.1. To let fully develop the flavor, let the jar rest in the refrigerator for at least 1 week but preferably 2.

Note: If you are in rush, let rest in your refrigerator at least overnight.

7. Serving

7.1.

Plate on a plate with part of the onion and other ingredients from the jar.

7.2.

Serve with bread of any kind and with a pilsner style of beer.

About the Author:
Tom the ChefFounder
# 1
  • Published Recipes: 269
  • Av. Recipe Evaluation:
  • Location: Iowa, USA
  • Member since: 2023-02-02

Disclaimer

  1. General Information Content on this page above, including the content provided on www.CookingHub.com, including all recipes, articles, and other materials, is for general informational purposes only. This content reflects the personal opinions and experiences of its authors and is not intended to provide professional dietary, medical, legal, or political advice. Please consult a qualified professional before making any decisions based on the information presented here.
  2. Content Ownership and Use Content on this page above, including content published on CookingHub.com is owned by the individual authors who created it. Only the authors can access, modify, or delete their content from the platform. Our content may be embedded on third-party websites and blogs without modification. No reimbursement will be provided for this use. If an author removes content from CookingHub.com, it will no longer be available through any embedded links.
  3. Limitation of Liability Neither www.CookingHub.com (operated by the CookingHub Foundation) nor content authors are responsible for any outcome or consequence resulting from the use of information on this site. This includes, but is not limited to:
    • Food Safety: Any health risk related to food handling, food quality, or failure to follow USDA recommendations (including minimum safe cooking temperatures).
    • Preparation Safety: The proper and safe handling of cooking equipment or its suitability for any given task.
    • Recipe Outcomes: The final look, taste, or success of following a recipe.
    • Ingredients and Equipment: The sourcing of ingredients, tools, equipment, or anything else related to the preparation and consumption of food.
    • Nutritional and Dietary Information: The accuracy of nutritional data. This information is provided as a courtesy and should not replace advice from a medical provider. You are responsible for verifying that a diet is suitable for your personal health needs.
    • Errors and Omissions: Any potential errors, typos, or unclear directions in articles and recipes.
  4. User Responsibility All readers, visitors, and users of embedded content are solely responsible for evaluating recipes and articles. You must make your own decisions about whether to follow the steps and recommendations provided. It is your responsibility to ensure that ingredients and preparation methods are safe and appropriate for your personal dietary restrictions and health conditions.