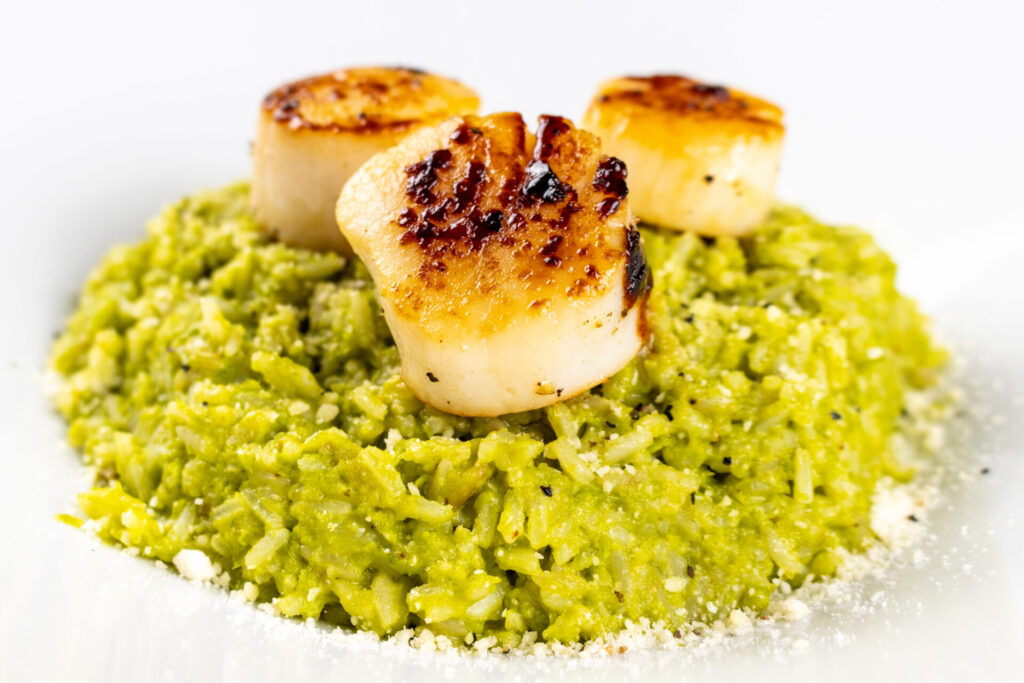
Cook, Learn, and Share to Fight Hunger.
  • 30 min.
  • 30 min.
  • 3/5

Ingredients:

Risotto:

Scallops:

Final Touch:

Recipes

Best served with:

Directions:

1. Pea Puree:

Let’s start the preparation of Pea Risotto with Scallops with the preparation of the pea puree.

Notes:

  • If you are using frozen peas, you do not need to defrost prior to cooking.
  • You can optionally just microwave the peas. If you do so, place peas in the glass mixing bowl (or measuring pitcher as I do), add about ½ cup of water (optionally more, but it may increase later on cooking time), and microwave until soft and hot (about 1 -2 minutes for fresh peas and 3 – 4 for frozen). Then, puree with an immersion blender (leave water in; it will become part of the puree).

1.1. Place in the small saucepan:

1 LB of peas
Water (just enough to make sure that all peas is fully immersed)

1.2.

Place the saucepan on medium-high heat.

1.3.

Bring it to a boil and then cook for an additional 30 seconds.

1.4.

Drain over the colander while reserving about ½ cup of the cooking water (the rest of the water will not be needed).

1.5.

Place the pea and ½ cup of the reserved cooking water back into the pot.

1.6.

Process with the immersion blender until smooth (usually about 1 – 2 minutes).

1.7.

Set aside for a later step (leave in the pot).

2. Risotto Base:

2.1. Preheat a stir-fry pan on medium-high heat with 5 TBSP of frying oil and add:

1 ½ cups of arborio rice

Cook with constant stirring for about 2 minutes

2.2. Then add:

1 cup of white wine of your choice

Cook with constant stirring until about half of the wine gets absorbed and evaporated (usually about 1 minute).

3. Risotto Body:

Important:
We are going to add vegetable broth in parts (about 4 parts total). If you reduce the temperature to medium, as the recipe asks for, 4 cups of the broth should be enough to cook the risotto in about 15 – 20 minutes.  If you run out of vegetable broth before the rice softens, simply just add water (the broth flavor will already be part of the meal, and there is no reason to add more broth).

3.1. Reduce heat to medium and add:

1 cup of vegetable broth (first about ¼ of the total amount)

Cook with constant stirring until the broth gets partially absorbed and partially evaporates – until the rice is almost dry (usually about 3- 5 minutes).

3.2. Add:

1 cup of vegetable broth (the second which is about ¼ of the total amount)

Cook with constant stirring until the broth gets partially absorbed and partially evaporated – until the rice is almost dry (usually about 3- 5 minutes).

3.3. Add:

1 cup of vegetable broth (the third which is about ¼ of the total amount)

Cook with constant stirring until the broth gets partially absorbed and partially evaporated – until the rice is almost dry (usually about 3- 5 minutes).

3.4. Add:

1 cup of vegetable broth (the fourth which is about ¼ of the total amount)

Cook with constant stirring until the broth gets partially absorbed and partially evaporated – until the rice is almost dry (usually about 3- 5 minutes).

Important:
Right now, your rice should be almost soft and pretty much edible. If not, add some water and slightly extend the cooking time.

3.5. Add:

1 stick of butter

And cook with constant stirring until fully dissolved (about 30 seconds to 1 minute).

3.6. Add:

Pea puree from step 1

Cook with constant stirring until the puree becomes part of the rice (usually about 2 minutes).

Tip:
If you prefer drier risotto, extend the cooking time

4. Complete the Risotto:

4.1. Take off the stove and add to the pan:

Juice from 1 lemon
Optional: 2 cloves of garlic –grated
1 TSP of salt
½ TSP of pepper
1 cup of parmesan – grated

Stir thoroughly until fully combined.

4.2.

Taste and add salt and pepper if needed.

4.3.

Cover with a lid (or aluminum wrap) and leave it in the pan until you plate.

5. Scallops’ Preparation:

5.1.

Rinse scallops under cold water and then place them on the plate.

5.2.

Squeeze part of the lemon evenly on the top of the scallops and gently drizzle with olive oil.

5.3.

Salt and pepper the scallops.

5.4.

Turn and squeeze the lemon on the top again, then drizzle with olive oil, salt, and pepper.

6. Pan Fry Scallops:

6.1.

Preheat the frying pan on high heat with 2 TBSP of frying oil.

6.2. Place scallops in.

Tip:
If your pan is big enough, place scallops just around the inner diameter (start at 12 o’clock). It will help you to track which ones were placed first and allow you to turn them in the same order.

6.3.

Pan fry from one side for about 2 minutes, then turn and panfry from the other side until done (another 2 minutes).*

7. Plating Pea Risotto with Scallops:

7.1.

Place risotto on the plate.

7.2.

Gently sprinkle with grated parmesan, salt and pepper.

7.3.

Place on the top of each portion about 3 – 4 scallops.

* Check with a food thermometer to make sure that you have reached the minimum recommended safe serving temperature of 145°F.
Kitchen Guide

Shellfish

The USDA minimum safe internal temperature is 145°F.

The popular serving temperature is the same as the minimum serving temperature.

About the Author:
Tom the ChefFounder
# 1
  • Published Recipes: 269
  • Av. Recipe Evaluation:
  • Location: Iowa, USA
  • Member since: 2023-02-02

Disclaimer

  1. General Information Content on this page above, including the content provided on www.CookingHub.com, including all recipes, articles, and other materials, is for general informational purposes only. This content reflects the personal opinions and experiences of its authors and is not intended to provide professional dietary, medical, legal, or political advice. Please consult a qualified professional before making any decisions based on the information presented here.
  2. Content Ownership and Use Content on this page above, including content published on CookingHub.com is owned by the individual authors who created it. Only the authors can access, modify, or delete their content from the platform. Our content may be embedded on third-party websites and blogs without modification. No reimbursement will be provided for this use. If an author removes content from CookingHub.com, it will no longer be available through any embedded links.
  3. Limitation of Liability Neither www.CookingHub.com (operated by the CookingHub Foundation) nor content authors are responsible for any outcome or consequence resulting from the use of information on this site. This includes, but is not limited to:
    • Food Safety: Any health risk related to food handling, food quality, or failure to follow USDA recommendations (including minimum safe cooking temperatures).
    • Preparation Safety: The proper and safe handling of cooking equipment or its suitability for any given task.
    • Recipe Outcomes: The final look, taste, or success of following a recipe.
    • Ingredients and Equipment: The sourcing of ingredients, tools, equipment, or anything else related to the preparation and consumption of food.
    • Nutritional and Dietary Information: The accuracy of nutritional data. This information is provided as a courtesy and should not replace advice from a medical provider. You are responsible for verifying that a diet is suitable for your personal health needs.
    • Errors and Omissions: Any potential errors, typos, or unclear directions in articles and recipes.
  4. User Responsibility All readers, visitors, and users of embedded content are solely responsible for evaluating recipes and articles. You must make your own decisions about whether to follow the steps and recommendations provided. It is your responsibility to ensure that ingredients and preparation methods are safe and appropriate for your personal dietary restrictions and health conditions.