Cook, Learn, and Share to Fight Hunger.
  • 60 min.
  • 120 min.
  • 2/5

Ingredients:

* Chicken livers help you to get a nice texture and delicate flavor undertone – for a great balance that is not overpowering. You can optionally substitute them with more pork sausage.

** Cut butter into small pieces before melting. Then, microwave for a short time with a few seconds break between – to prevent little “explosions”. Optionally, melt the butter over low heat with occasional whisking.

Recipes

Best served with:

Directions:

1. Set oven to preheat to 330°F.

2. Liver pate batter:

2.1.

Sauté Onions:

2.1.1. Preheat a pot on medium-high heat with 2 TBSP of frying oil and add:

1 medium onion – finely chopped

Sauté with occasional stirring until glossy (about 3 – 4 minutes).

2.1.2.

Then, take the pot off the stove and let it partially cool while proceeding with the next step.

2.2.

Liver preparation:

2.2.1.

Clean livers thoroughly under cold water in order to remove surface bacteria.

2.2.2.

Remove and dispose of membranes and place livers into the kitchen food processor.

2.3.

Complete pate batter:

2.3.1. Add into the kitchen food processor:

1 LB of ground pork sausage
3 springs of rosemary – dispose of stem
3 cloves of garlic – peeled
½ cup of heavy cream
1 stick of butter – melted
3 large eggs
1 TSP of salt
1 TSP of ground pepper
Sauteed onion from the step 2.1.

And thoroughly process on high speed until a smooth paste is created (usually about 3 – 5 minutes).

2.3.2. Pour liver pate batter into a mold.

Note:
No need to grease the mold.

3. Bake & cooling:

3.1.

Bake in a preheated oven until fully baked * (about 50 minutes).

3.2. After fully baked, remove from the oven and place on a countertop (leave In the mold), and let cool at room temperature before further manipulation.

Important:
Perform all the cooling in the mold, and if any liquid is present, leave it there for the entire cooling.

3.3.

Then place to fully cool into the refrigerator (leave in the mold and make sure that pate will fully cool).

4. Remove from the mold:

4.1.

After the pate reaches the refrigerator’s temperature, remove it carefully from the mold and dispose of any liquid if present.

5. Resting & Serving:

5.1. Slice into thick slices (from ¼” to ½”) based on your preferences.

Note:
Properly prepared pate will have a fully cooked but still slightly creamy inner texture.

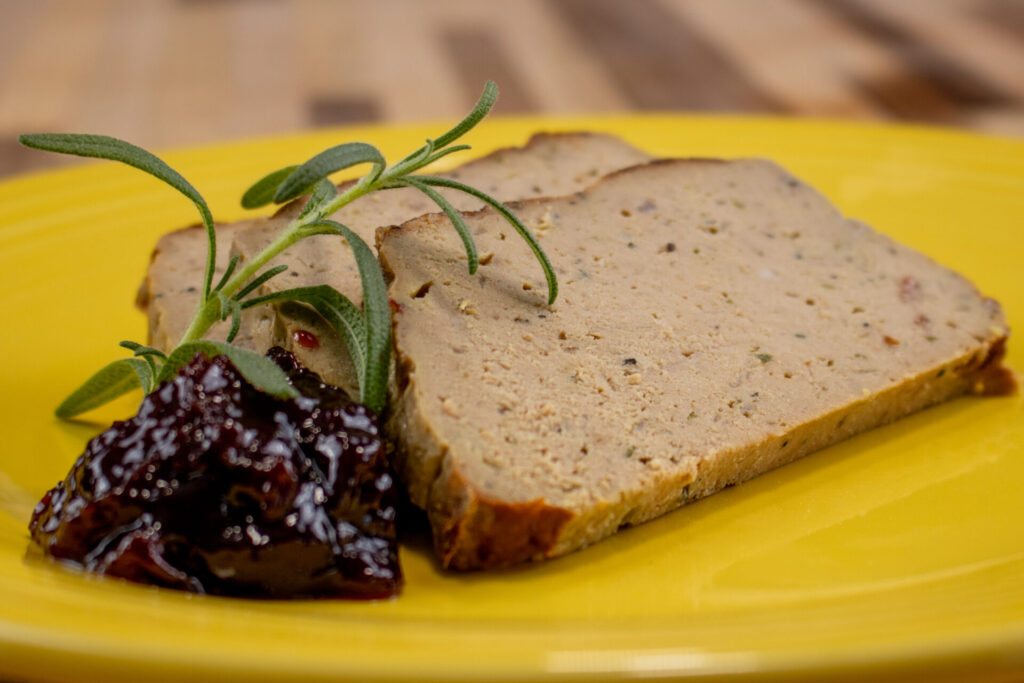
5.2. Serve sliced with bread, baguette, or crackers and with a touch of cranberry preserve.

Tip:
If you can cut thin slices of pate, you can even serve it on a slice of baguette with a few microgreens/arugula to create elegant canapes.

* Check with a food thermometer to make sure that you have reached the minimum recommended safe serving temperature for ground meat of 160°F.
Kitchen Guide

Ground Meat With the Exception of Poultry

The USDA minimum safe internal temperature is 160°F.

A Parisian Love Affair: Conquering the Classic Pâté

Read more

Ah, pâté. The word itself conjures up images of charming Parisian bistros, crusty baguettes, and a certain je ne sais quoi that whispers of culinary sophistication. But fear not, fellow food enthusiasts! This seemingly intimidating delicacy is far more accessible than you might think. Today, we embark on a culinary adventure to demystify the pâté and equip you with the skills to create your own masterpiece.

Our journey begins in 18th century France, where this genius invention first graced tables and delighted palates. Pâté, in its essence, is a rich and flavorful mixture of meat, typically ground, and often incorporating luxurious ingredients like liver and spices. It’s then baked into a smooth, spreadable concoction that’s perfect for enjoying with crusty bread or crackers.

This particular recipe, however, is not your stuffy, old-world pâté. It’s a vibrant, fresh take, designed for the modern cook who craves both flavor and simplicity. Think of it as your gateway to pâté perfection, a recipe that will have you feeling like a true culinary artist without the fuss and fanfare of complicated techniques.

The Star of the Show: Chicken Livers (But Don’t Worry, There’s Pork Too!)

Now, I know what you might be thinking: “Liver? In my pâté?” But trust me on this one. Chicken livers, with their delicate flavor and smooth texture, add a depth and complexity that elevates this pâté to new heights. They play a supporting role to the main act – the hearty and flavorful ground pork sausage. The combination is pure magic, a harmonious blend of richness and subtle nuances that will have you going back for seconds (and thirds!).

The Secret Weapon: A Silicone Mold

Before we dive into the recipe, let’s talk tools. While a traditional pâté mold certainly has its charm, I’m a big fan of using a silicone mold. Not only does it make the unmolding process a breeze, but it also offers excellent heat distribution for even cooking. Plus, let’s be honest, silicone molds are just plain fun to work with!

Ready to Get Cooking? Let’s Go!

Step 1: The Aromatic Foundation

We begin by building a flavor base that will make your taste buds sing. Finely chopped onions are gently sautéed in your favorite frying oil until they turn a beautiful golden brown and become irresistibly sweet. This caramelized onion base adds a touch of sweetness that perfectly complements the richness of the pâté.

Step 2: Liver Love

Next, we turn our attention to the chicken livers. A quick rinse under cold water ensures they’re clean and ready for their transformation. Then, it’s into the food processor they go, along with the star of the show – the ground pork sausage. We also add aromatic rosemary, pungent garlic, creamy heavy cream, melted butter (oh, the richness!), and a touch of salt and pepper for good measure. A whirl in the food processor transforms this medley of ingredients into a smooth and luscious batter.

Step 3: Baking and Patience

With the batter ready, it’s time to bake our creation. The oven, preheated to a gentle 330°F, will work its magic, transforming the batter into a beautifully set pâté. This is where patience comes into play. Allow the pâté to cool completely in the mold, first at room temperature and then in the refrigerator. This gradual cooling process ensures a perfectly textured pâté that slices like a dream.

Step 4: The Grand Unveiling

Once chilled, it’s time to unmold your masterpiece. Thanks to our trusty silicone mold, this step is a breeze. Gently remove the pâté, revealing its smooth, velvety surface. Slice it into generous portions and prepare to be amazed.

Step 5: Serving with Style

The beauty of pâté lies in its versatility. Serve it on crusty bread, alongside a simple salad, or get creative with elegant canapés. A dollop of cranberry sauce adds a touch of sweetness and acidity that cuts through the richness of the pâté.

The Final Word

There you have it – a journey into the world of pâté that’s both approachable and delicious. This recipe is your passport to culinary confidence, proving that even seemingly complex dishes can be conquered with simple techniques and quality ingredients. So go forth, embrace your inner chef, and create a pâté that will impress your friends and family (and maybe even yourself!).


Read less
About the Author:
Chef TomFounder
# 1
  • Published Recipes: 251
  • Av. Recipe Evaluation:
  • Location: Iowa, USA
  • Member since: 2023-02-02

Add My Review

If you want to add your review, you must log in.

Disclaimer

All content and information (including recipes, articles, and other materials) on CookingHub.com are the opinions of the authors and are not intended to provide dietary, medical, legal, or political advice. Consult with a professional before deciding to follow these opinions.

Authors and www.CookingHub.com (operated by CookingHub Foundation) are not responsible for any part of any possible outcome or its consequences, which include (but are not limited to):

  • Any health risk related to the handling of food, food quality, and/or not following USDA recommendations (including minimum safe serving temperatures and other guidelines).
  • Safety during preparation, including the handling of equipment and the equipment’s suitability for food preparation.
  • Improper performance of cooking techniques.
  • Sourcing of ingredients, providing tools, equipment, and anything else related to the preparation and consumption of the products of this recipe.
  • Nutritional data and information and diet-related information (and their accuracy). It is important to consult with your medical provider to ensure that the diet you are considering is suitable for you and to verify the information provided before proceeding.
  • The overall outcome of following recipes, including the look and taste of the final product.
  • Possible errors in articles and recipes (including incorrectly or unclearly explained steps and directions).
  • Typos.

All readers (users and visitors of www.CookingHub.com) are responsible for evaluating the recipes and articles and making their own decisions about whether to follow the steps and recommendations. They must ensure that the ingredients and steps fit with their dietary restrictions and avoid preparation methods that could pose a health risk due to an unsuitable diet.