Cook, Learn, and Share to Fight Hunger.
  • 45 min.
  • 75+ min.
  • 2/5

Ingredients:

Crispy chicken:

The rest of the sandwich:

Final touch:

  • salt - ideally freshly ground

*   In my opinion, boneless chicken thighs with skin on are perfect for this sandwich since they are moist and have more flavor. However, if you prefer a leaner meat, chicken breasts are a great choice too.

Recipes

Best served with:

a sandwich with lettuce, tomato and mayo.

Directions:

1. Marinade:

1.1. Place these ingredients into a medium mixing bowl:

1 cup of milk
2 cloves of garlic – grated
½ TSP of paprika (½ of total amount)
½ TSP of chili powder (½ of total amount)
½ TSP of ground cayenne powder (½ of total amount)
½ TSP of ground black pepper (½ of total amount)
½ TSP of salt

Whisk together until incorporated (about 1 – 2 minutes).

Tom Tom Founder

Meat & Fish Preparation

October 18, 2023

Correct preparation of meat and fish should be regular step for any cook. Basically, preparation starts with a thorough rinsing followed by the removal of unwanted parts to the portioning of the meat and fish (the exception to these rules would be ground meat). The major focus of this section is to explain the basic methods on already cut portions.

2. Meat preparation:

2.1. Make sure that the boneless chicken thighs are properly rinsed under cold water.

Notes:

  • Do not cut thighs into pieces – each sandwich will get one thigh.
  • I prefer to leave the skin on, but you can optionally remove it and dispose of it.

2.2.

Place thighs into a medium mixing bowl with the marinade and stir with a spatula until the chicken thighs get coated with marinade.

2.3.

Cover with a plastic wrap and marinate in the refrigerator for at least 30 minutes (or preferably overnight).

2.4.

Cover with a plastic wrap and marinade in the refrigerator for at least 30 minutes (or preferably overnight).

3. Preheat frying oil:

3.1.

Please read the the directions about deep frying below before proceeding.

3.2.

Set to preheat your oil at 320°F.

Deep Frying

October 17, 2023

Deep frying is a very popular cooking method. Unfortunately, it is also considered unhealthy since deep fried food represents higher calorie intake when compared to non-fried food. With frequent consumption it can lead to unwanted weight gain. Even though deep frying sounds for some people almost scary, it is simply submerging food in hot oil which leads to instantly cooking the surface while moisture is trapped in the food and keeps cooking the food from the inside.

Tom Tom Founder

4. Flour mixture:

4.1. Place into the other large mixing bowl:

4 cups of all-purpose flour
½ TSP of paprika (other ½ of total amount)
½ TSP of chili powder (other ½ of total amount)
½ TSP of ground cayenne powder (other ½ of total amount)
½ TSP of ground black pepper (other ½ of total amount)
½ TSP of salt
2 TSP of baking powder

Thoroughly stir with a whisk until fully incorporated (about 1 – 2 minutes).

5. Bread the meat:

Important:

  •  To create very even results, I prefer to complete each of the following steps with all thighs before moving to other steps.
  • However, I always complete each step working with each thighs one by one.
  • Never grab multiple tenders at one time.

5.1. Using tongs, place all thighs from the marinade into the flour mixture (let the liquid drip off for a couple of seconds before placing in the flour mixture).

Notes:

  • Make sure that they are not directly touching each other in the mixture: cover each piece in the flour mixture with your hands.
  • When all pieces are in the mixture, shake the bowl to improve the coating.

5.2. Create an egg wash mix by adding into the bowl with the marinade that was left after you took the chicken out:

3 large eggs

Whisk until fully incorporated (about 1 – 2 minutes).

5..3.

Place all thighs into the egg wash mix using tongs.

5.4. Place all thighs back into the flour mixture using tongs (let each drip the liquid off for a couple of seconds).

Important:

  • Make sure that they are not directly touching (the same process as in step 5.1).
  • When all pieces are in the mixture, shake the bowl well to improve coating.

5.5. From now on, touch the thighs only with your hands (no tongs) since the coating is fragile. Gently shake off the excess flour from the mixture and place each thigh on a baking sheet.

Important:
Make sure that they are not touching.

6. Deep fry:

Note:
Work in two or more batches (based on the size of your deep fryer).

6.1.

Make sure that the oil is preheated to 320°F.

6.2.

Carefully place the thighs into the fryer one by one.

6.3.

Fry immersed in oil until a nice golden color is reached, and the meat is fully cooked (about 5 – 7 minutes from each side). *

6.4.

When done, remove to a cooling rack or plate with a paper towel and let the excess oil drip off (about one minute).

6.5.

Sprinkle with salt.

7. Assemble sandwiches:

7.1.

Cut each of the 4 buns into halves. Optionally, toast the buns in a toaster or spread a fine layer on the cut part of the buns and briefly sear on a medium burner until crispy.

7.2.

Spread mayonnaise on each half (about 1 TBSP each half).

7.3.

Place the roughly chopped lettuce on the bottom half of each sandwich (about ¼ Cup for each sandwich).

7.4.

Place 1 piece of chicken on the top of chopped iceberg lettuce.

7.5.

Spread 1 TBSP of BBQ sauce on the top of each piece of chicken.

7.6.

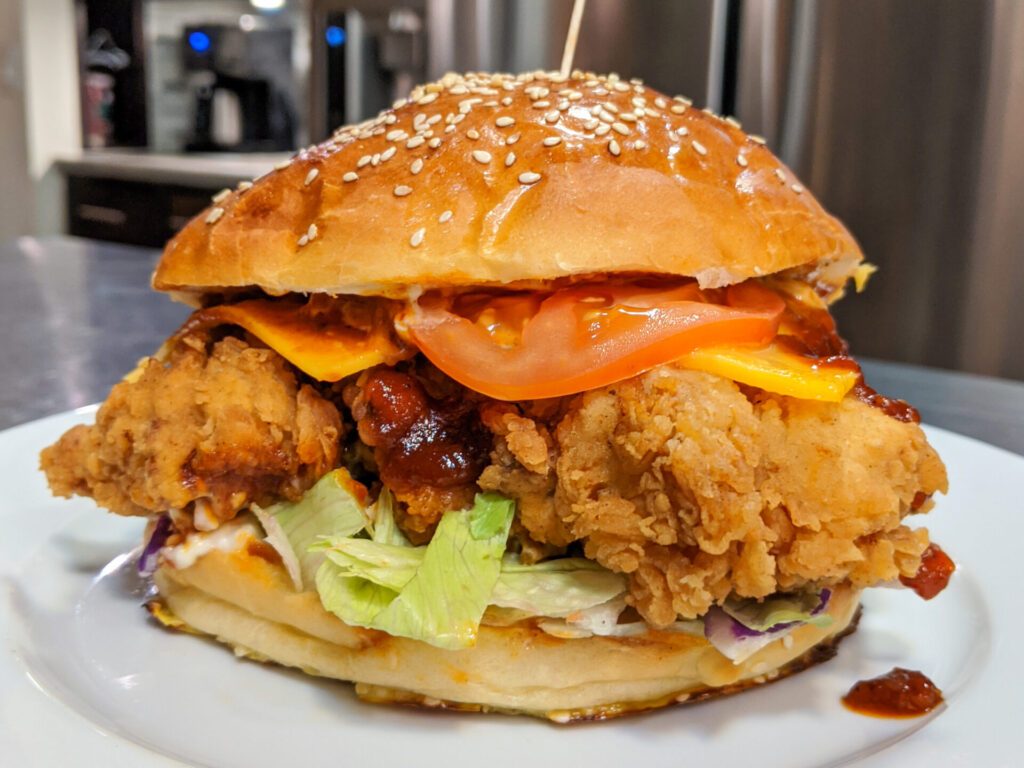
Add 2 slices of cheddar and 2 slices of tomato on top of the chicken.

7.7,

Cover with the top part of the bun and serve.

* Check with a food thermometer to make sure that you have reached the minimum recommended safe serving temperature for poultry of 165°F.
Kitchen Guide

Poultry

The USDA minimum safe internal temperature is 165°F.

The popular serving temperature is the same as the minimum serving temperature.

About the Author:
TomFounder
# 1
  • Published Recipes: 237
  • Av. Recipe Evaluation:
  • Location: Iowa, USA
  • Member since: 2023-02-02

Add My Review

If you want to add your review, you must log in.

Disclaimer

All content and information (including recipes, articles, and other materials) on CookingHub.com are the opinions of the authors and are not intended to provide dietary, medical, legal, or political advice. Consult with a professional before deciding to follow these opinions.

Authors and www.CookingHub.com (operated by CookingHub Foundation) are not responsible for any part of any possible outcome or its consequences, which include (but are not limited to):

  • Any health risk related to the handling of food, food quality, and/or not following USDA recommendations (including minimum safe serving temperatures and other guidelines).
  • Safety during preparation, including the handling of equipment and the equipment’s suitability for food preparation.
  • Improper performance of cooking techniques.
  • Sourcing of ingredients, providing tools, equipment, and anything else related to the preparation and consumption of the products of this recipe.
  • Nutritional data and information and diet-related information (and their accuracy). It is important to consult with your medical provider to ensure that the diet you are considering is suitable for you and to verify the information provided before proceeding.
  • The overall outcome of following recipes, including the look and taste of the final product.
  • Possible errors in articles and recipes (including incorrectly or unclearly explained steps and directions).
  • Typos.

All readers (users and visitors of www.CookingHub.com) are responsible for evaluating the recipes and articles and making their own decisions about whether to follow the steps and recommendations. They must ensure that the ingredients and steps fit with their dietary restrictions and avoid preparation methods that could pose a health risk due to an unsuitable diet.